Stop Wasting Time: A 3-Minute Tutorial on davinci resolve subtitles Import
Published in 2026-01-28
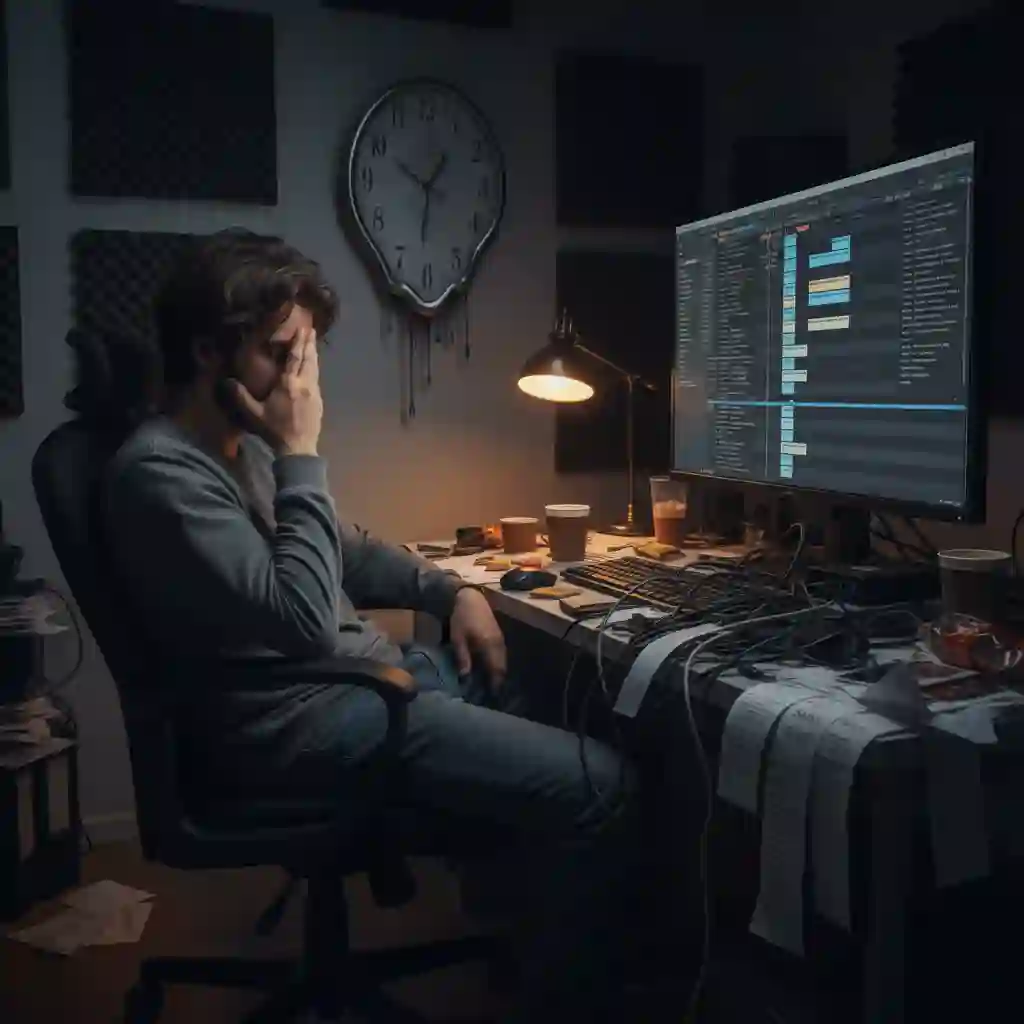
Stop spending afternoons syncing text for your DaVinci Resolve subtitles. Typing and aligning dialogue frame by frame is tedious, leading to a significant bottleneck and distracting you from creative editing work. A ten-minute video should not require hours of captioning effort.
Most guides focus on the exclusive auto-caption feature in the paid Studio version, while others suggest minor manual shortcuts that save little time. As a result, many creators are left using inefficient methods.
This tutorial presents a workflow designed to transform your process. We will move beyond the basics and focus on the fastest, most effective method available to all users: the superior SRT import technique.
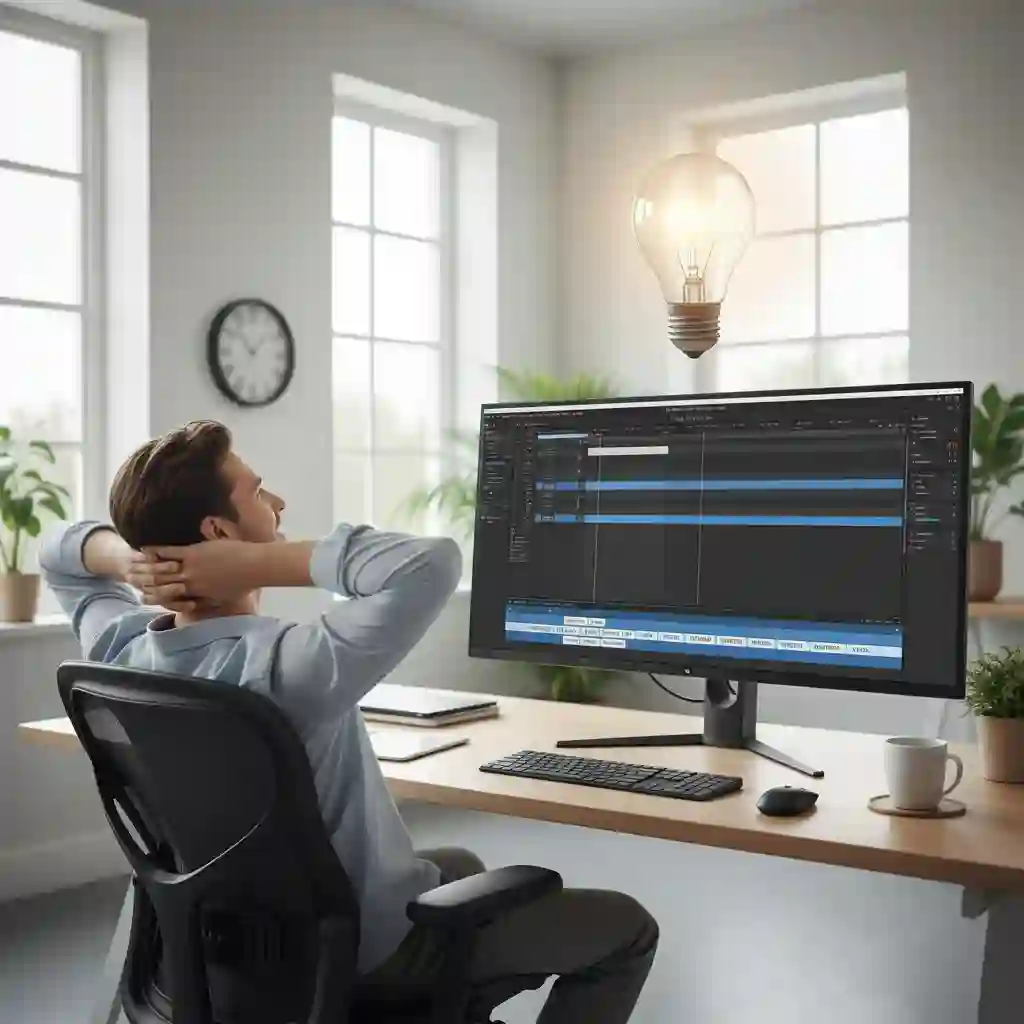
With this guide, you will master a process that streamlines your workflow. Managing DaVinci Resolve subtitles shifts from being a multi-hour task to a simple, three-minute action. Prepare to reclaim your valuable creative time.

1.Why the davinci resolve srt import is the Most Efficient Choice
1.1. davinci resolve subtitles format Comparison: SRT vs. Manual Creation
Stop creating subtitles inside DaVinci Resolve by hand. That approach is slow and prone to errors. Smart creators use a better way for their DaVinci Resolve subtitles: SRT files.
An SRT file is a plain text document that includes a sequential number for each subtitle, precise timecodes indicating when each subtitle appears and disappears, and the subtitle text. This simple, universal format is the industry standard for DaVinci Resolve subtitles.
Consider this striking comparison: Adding DaVinci Resolve subtitles to a 10-minute video by hand takes about 90 minutes, with an error rate of around 8%. In contrast, the davinci resolve srt import workflow takes under 5 minutes, with a machine-generated error rate below 2%.
The difference in efficiency speaks for itself. Choosing SRT means you to save over 85 minutes, making it the best choice for your DaVinci Resolve subtitle tasks.
Discussions on community platforms often emphasize this struggle, where users frequently ask about davinci resolve subtitles workflow speed and search for shortcuts that can eliminate tedious manual typing and prevent slowdowns in their overall editing pipeline. (What's the quickest way to add subtitles to your video)
1.2. Free subrip software Recommendation: Subtitle Edit
You need a tool to create or edit SRT files. We recommend Subtitle Edit for this. It is a powerful and free subrip software. It serves as the perfect companion for davinci resolve subtitles.
Subtitle Edit helps you create subtitles and convert formats. For example, you can convert Final Cut Pro captions to the DaVinci Resolve subtitles format. This flexibility is crucial for editors who work across platforms.
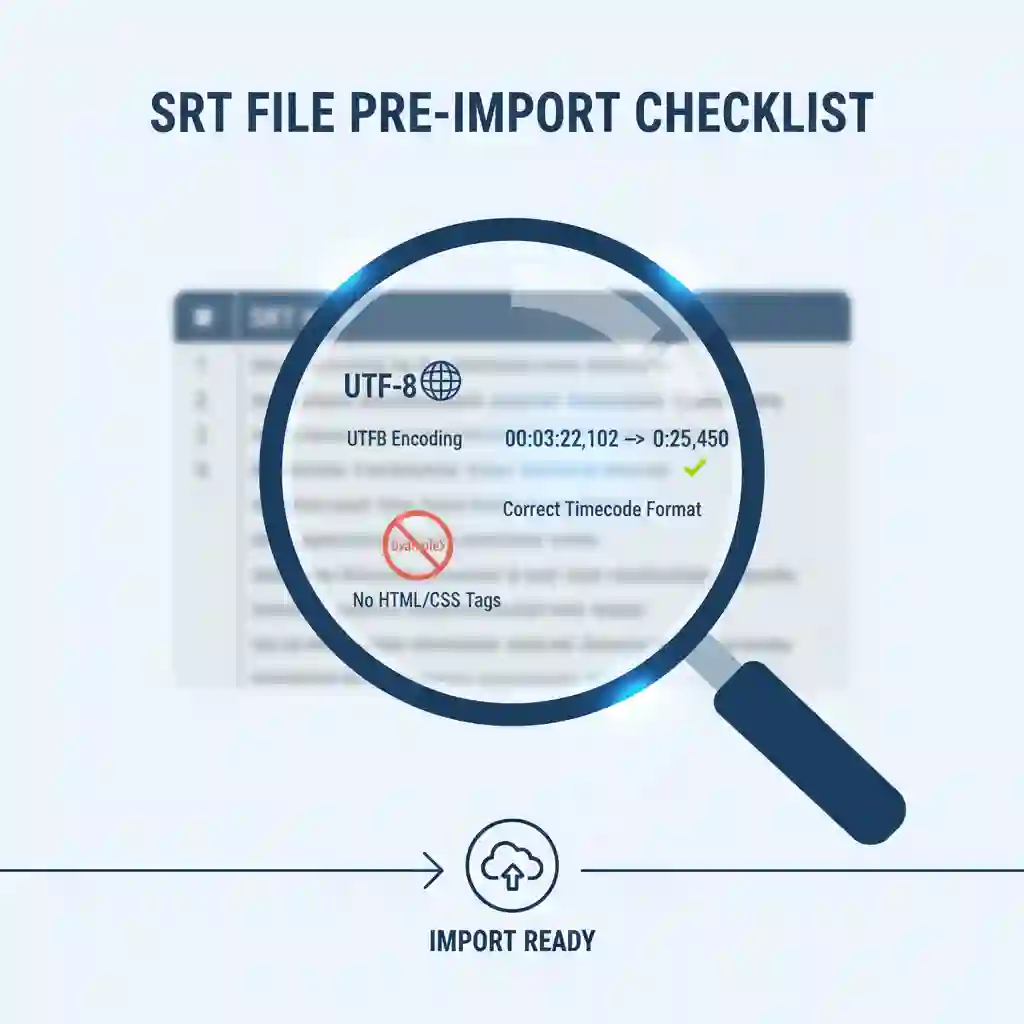
1.3. Pre-Import Checklist to Avoid Rework
Perform a quick 30-second check before the DaVinci Resolve SRT import to prevent problems. First, ensure your SRT file uses UTF-8 encoding, which is a character encoding standard that ensures text displays correctly—this avoids garbled text inside Resolve.
Next, scan the timecode format to ensure it's correct. The standard format is hours:minutes:seconds,milliseconds (for example, 00:03:22,102). Finally, check that the text is free of stray HTML tags, as these are bits of code that can disrupt how DaVinci Resolve displays subtitles.
2.Free Methods for Getting SRT Files
2.1. The Ultimate Free Solution: Using "subtitle edit whisper"
This workflow is transformative for free DaVinci Resolve users. You can auto-generate subtitles using the free Subtitle Edit software with integrated Whisper technology, producing accurate DaVinci Resolve subtitles.
The steps are straightforward: Export audio from DaVinci Resolve as a WAV or MP3 file—this audio forms the basis for your DaVinci Resolve subtitles.
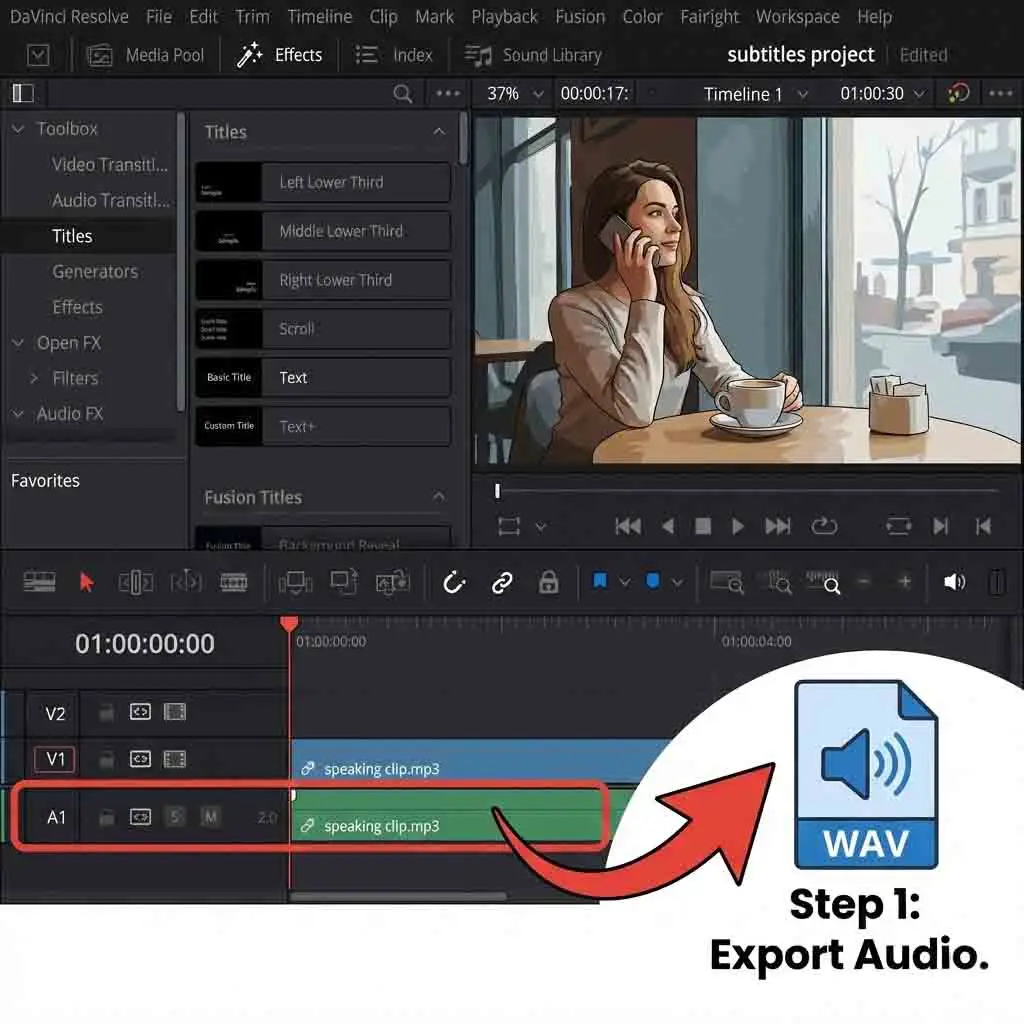
Next, open Subtitle Edit and drag your audio file into the program. Select 'Audio to text (Whisper)' from the 'Video' menu, choose your language, and click generate. The AI transcribes your audio in minutes, producing timed DaVinci Resolve subtitles.
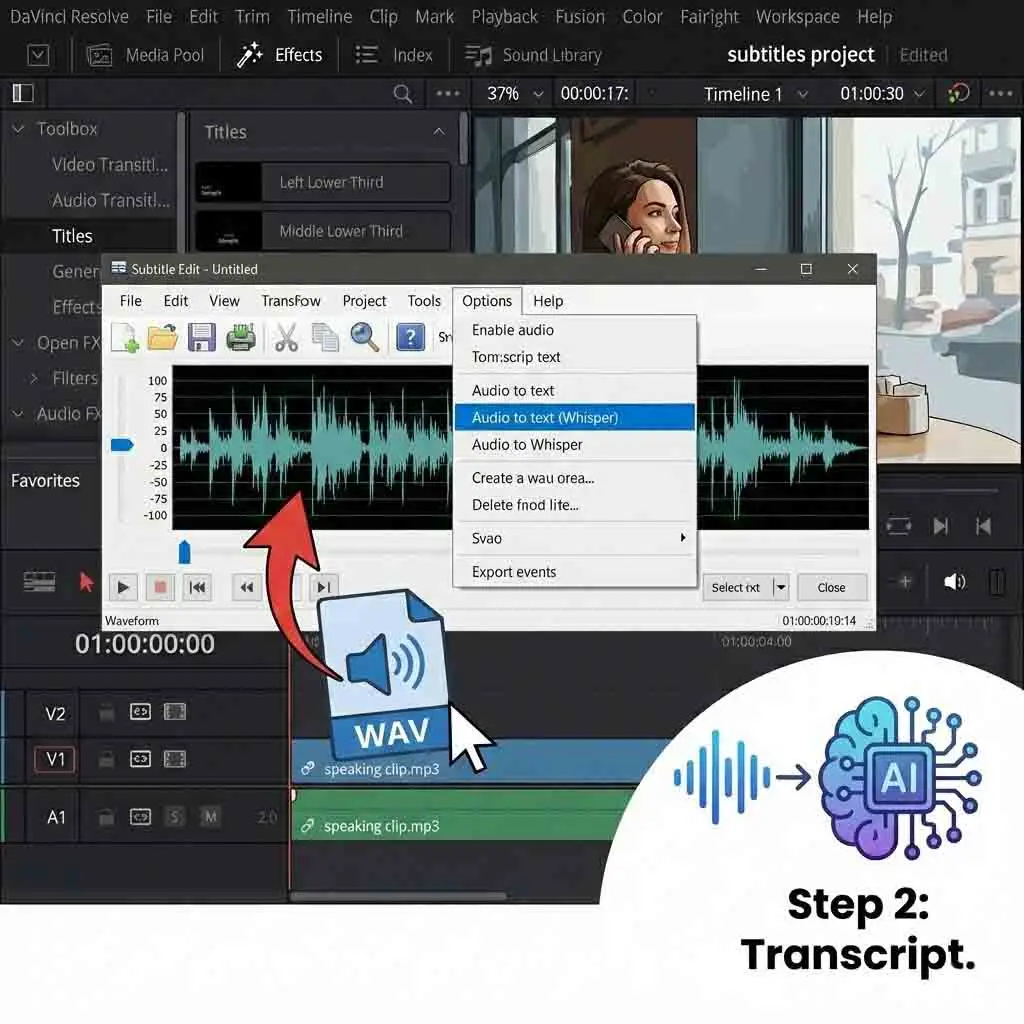
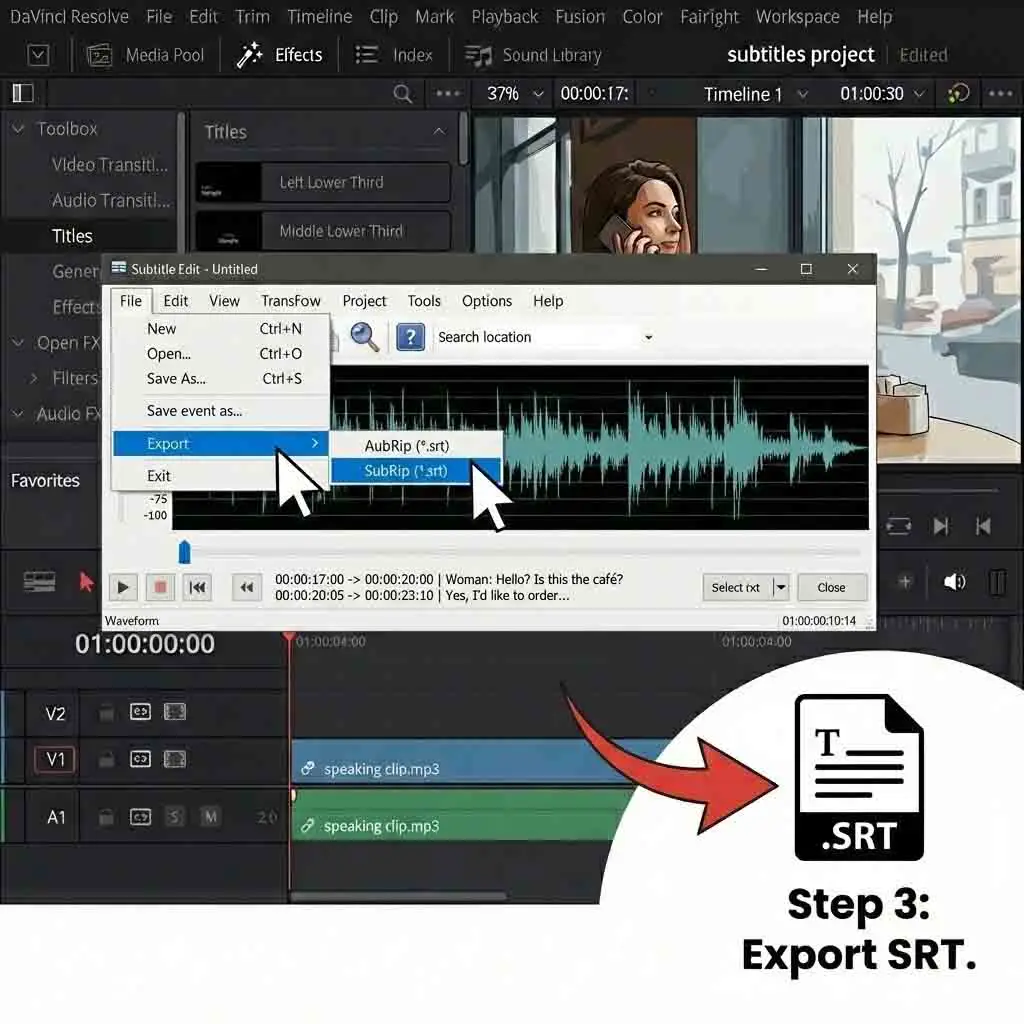
Finally, export the transcription as an SRT file. You now have a high-quality, accurate subtitle file for DaVinci Resolve, created with the best free Subtitle Edit Whisper method.
For example, in a tech review video about new chips, common speech-to-text tools struggle with terms like 'nanometer' or 'ray tracing.' Whisper identifies specific vocabulary, ensuring your DaVinci Resolve subtitles are professional and accurate and saving you proofreading time.

Visual learners can see this efficiency in practice, as many tutorials demonstrate how automatic tools generate davinci resolve subtitles, clearly proving that AI-assisted captioning significantly outperforms traditional manual typing methods in both speed and accuracy. (How to add AUTOMATIC SUBTITLES in Davinci Resolve)
How to add AUTOMATIC SUBTITLES in Davinci Resolve
YouTube Video
2.2. Online Alternative: kapwing subtitles Pros and Cons
In addition to desktop software, online tools like Kapwing offer auto-captioning from your browser, eliminating the need for installation. The process is quick and convenient for DaVinci Resolve subtitles.
However, free plans for tools like Kapwing may limit export length or add a watermark. This is less suitable for longer projects that need a clean, complete DaVinci Resolve subtitle file.
2.3. The "auto subtitles davinci resolve" Function for Studio Users
If you are a paid DaVinci Resolve Studio user, you can use the built-in feature. This is the auto subtitles davinci resolve function. Find it under the "Timeline" menu. It is very convenient because it is integrated. You do not need external files.
This native function is a strong selling point for Studio, but highlights the value of the external SRT method for free users. Whisper offers high accuracy, enabling everyone to create great DaVinci Resolve subtitles—free users can meet or exceed the paid feature's quality.
If you upgrade to the full software suite, you unlock powerful native features, and recent video guides explain how the Studio version handles davinci resolve subtitles with deeply integrated automation that rivals many external plugins and standalone subtitle utilities. (know about Automatic Subtitles in DaVinci Resolve Studio)
know about Automatic Subtitles in DaVinci Resolve Studio
YouTube Video
3.The 3-Minute Core Task: How to add subtitles in davinci and Configure Them
3.1. From Import to Display: Adding Subtitles in 30 Seconds
With your SRT file, adding subtitles to your project takes under 30 seconds. Skip manual creation—handle subtitles the better way.
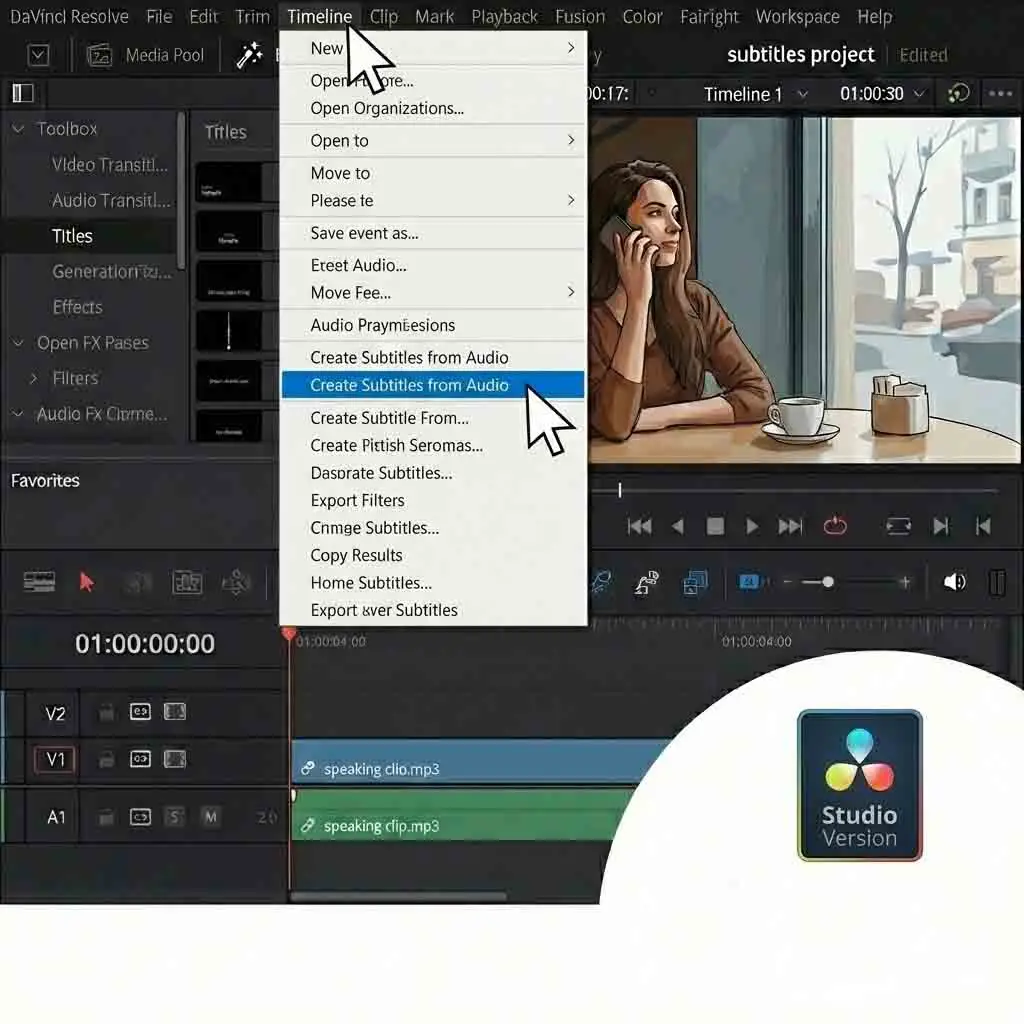
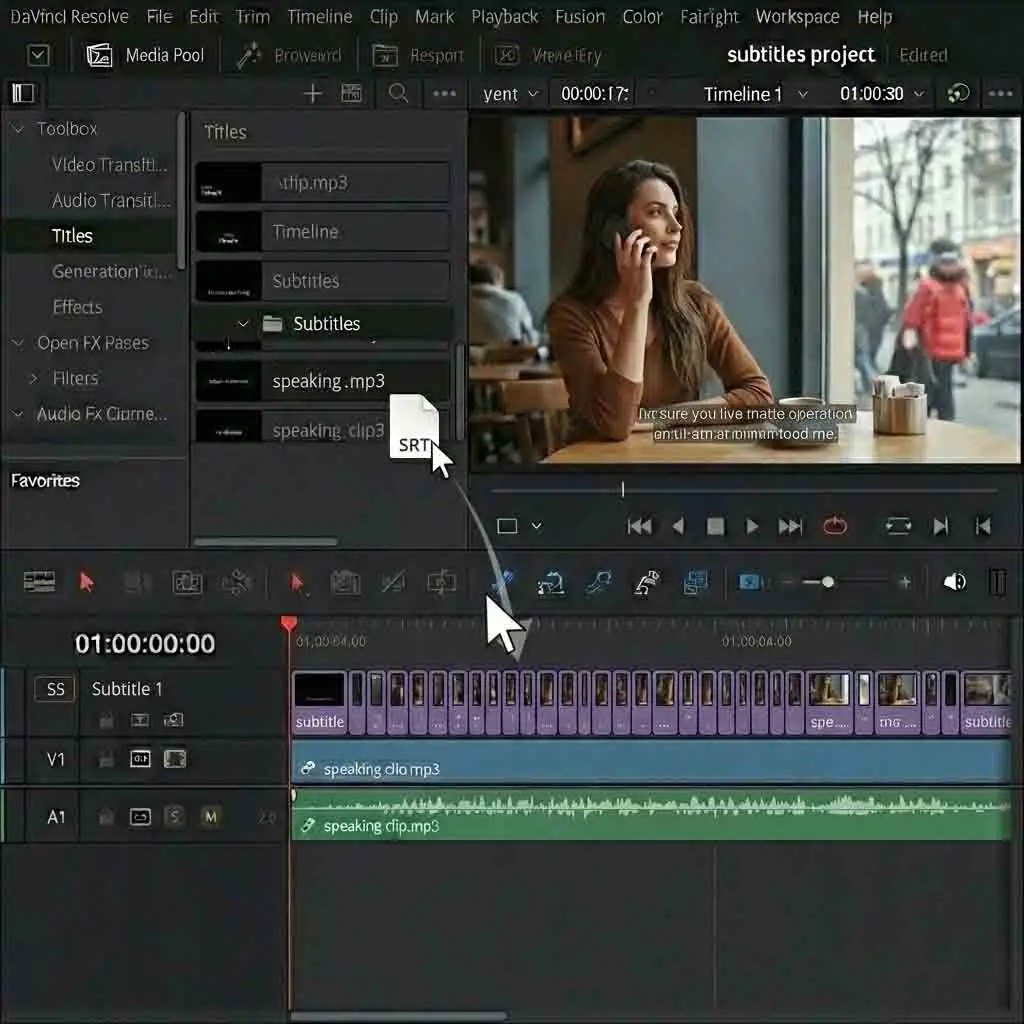
First, drag your SRT subtitle file from your computer's folder. Drop it into the DaVinci Resolve Media Pool. It will appear alongside your other assets.
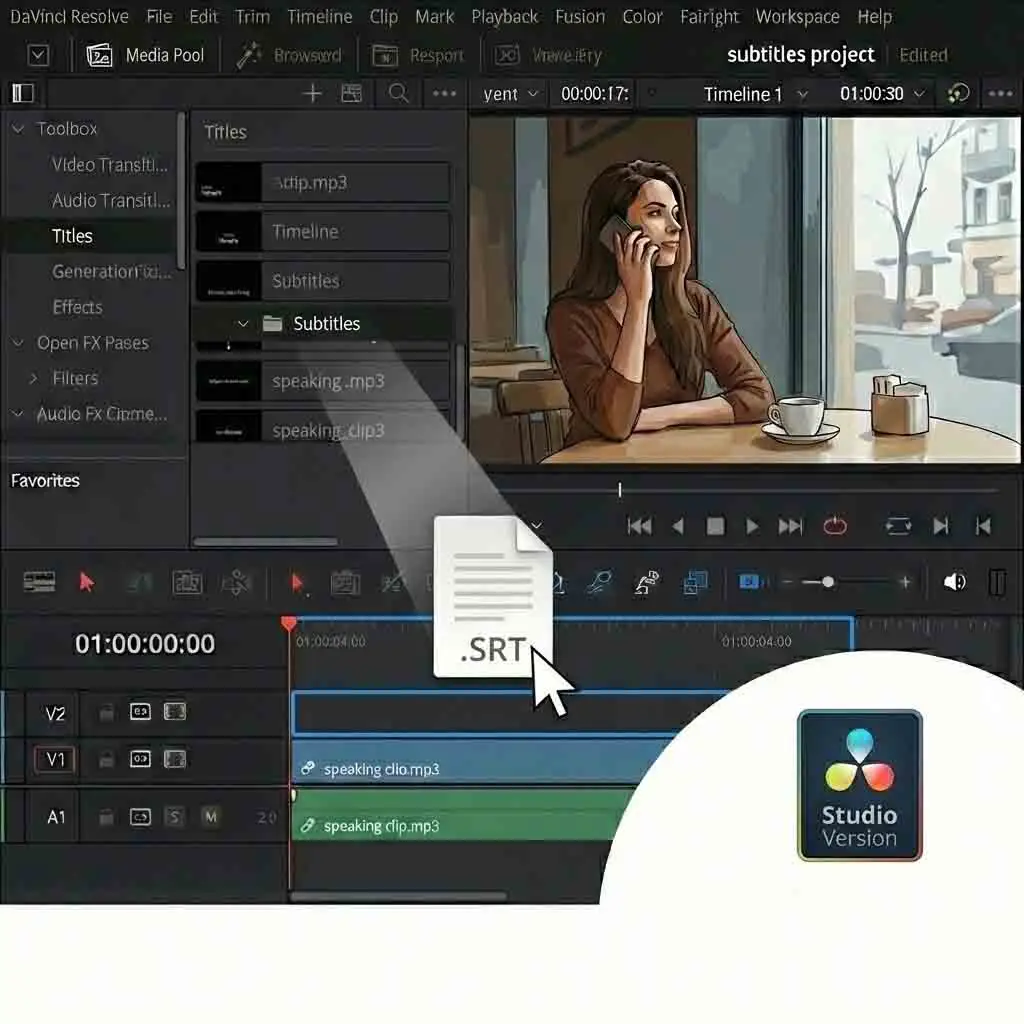
Second, right-click in the empty space above your video tracks on the timeline. Select "Add Subtitle Track" from the context menu. A new track dedicated to davinci resolve subtitles will appear.
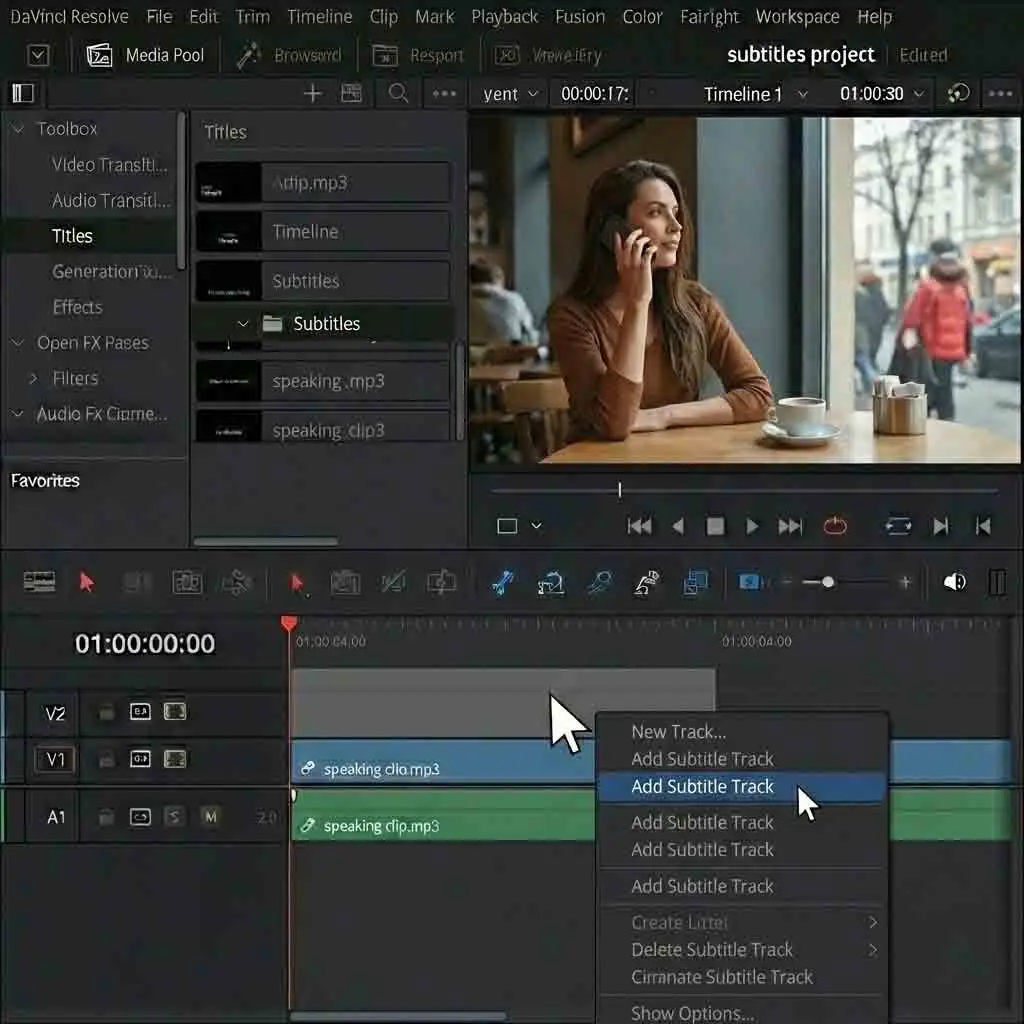
For the final step, drag the SRT file from your Media Pool. Place it onto this new subtitle track. That's it! All your davinci resolve subtitles are now synced on the timeline.
Short‑form creators frequently share time‑saving tricks, and you can find quick clips demonstrating DaVinci Resolve drag‑and‑drop techniques that show how rapidly projects with davinci resolve subtitles can be imported and prepared for social platforms like TikTok. (davinci resolve captions tutorial)
davinci resolve captions tutorial
TikTok Video
3.2. Bulk Styling: How to Quickly edit subtitles davinci
After importing, you will want to style your subtitles. There is a key trick to edit subtitles davinci and avoid repetitive work. Do not select an individual subtitle clip to change its style.
Instead, ensure you select no clips on the subtitle track. Then, go to the Inspector window and click on the "Track" tab. Make any change here, such as font, size, color, or background. The system applies these changes globally to all davinci resolve captions on that track.
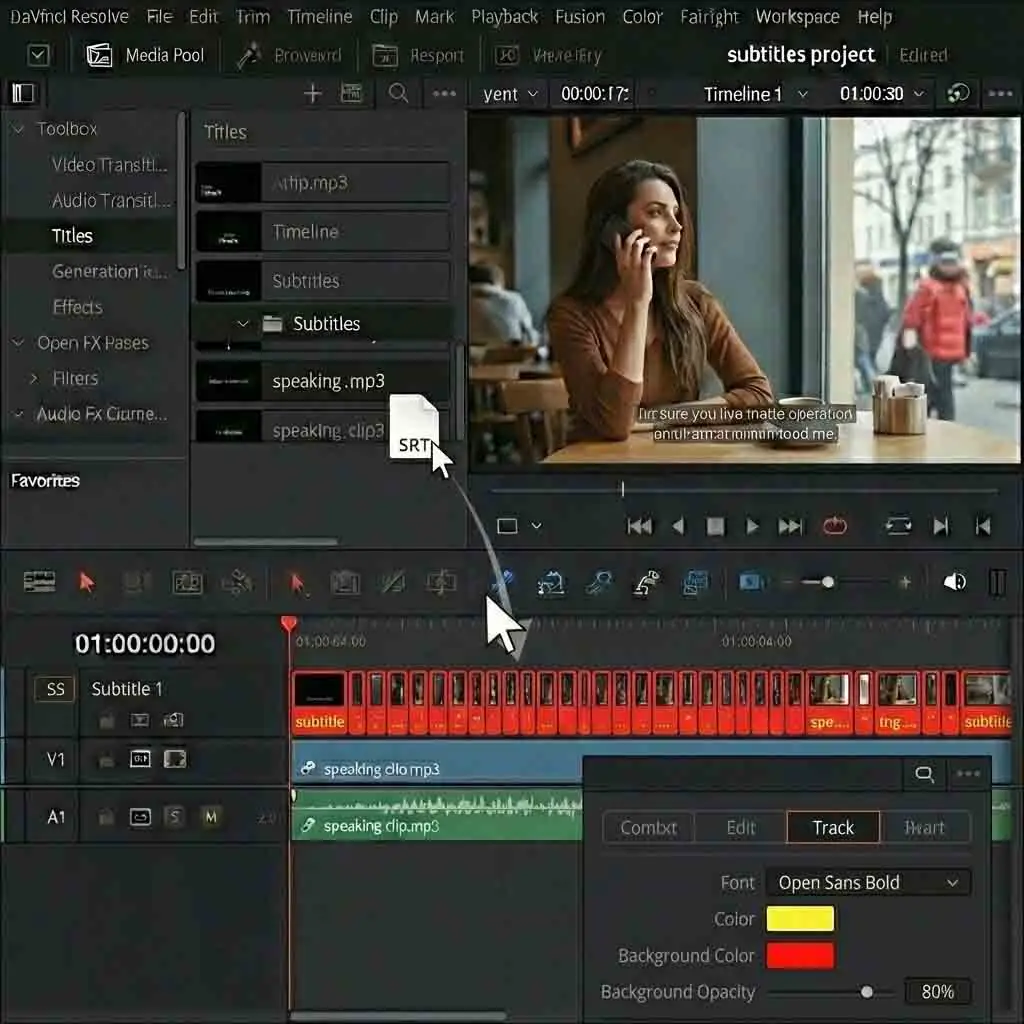
This bulk-editing method is the most efficient way to work. It helps manage your davinci resolve subtitles appearance. You only need to set the style once. This ensures a consistent look across your entire video.
Visual consistency is crucial on social media, and detailed posts often showcase how to style captions so that text stands out clearly while harmonizing with existing davinci resolve subtitles settings, eliminating the need for frame‑by‑frame manual adjustments. (How to Add Auto-Captions in DaVinci Resolve)
How to Add Auto-Captions in DaVinci Resolve
Instagram Video
3.3. Individual Tweaks and Shortcuts
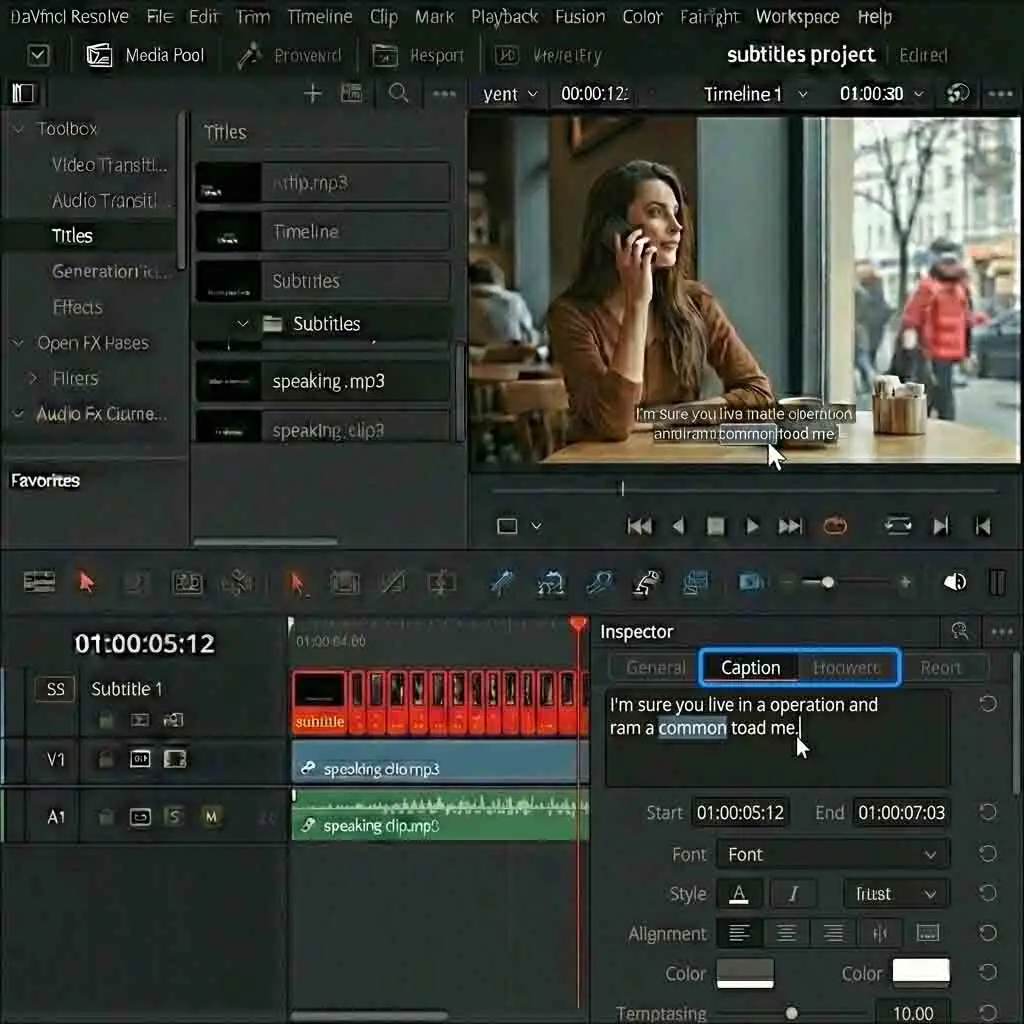
You may sometimes need to adjust a single davinci resolve subtitles entry. This is also easy. Click on the specific subtitle clip on your timeline that you want to edit.
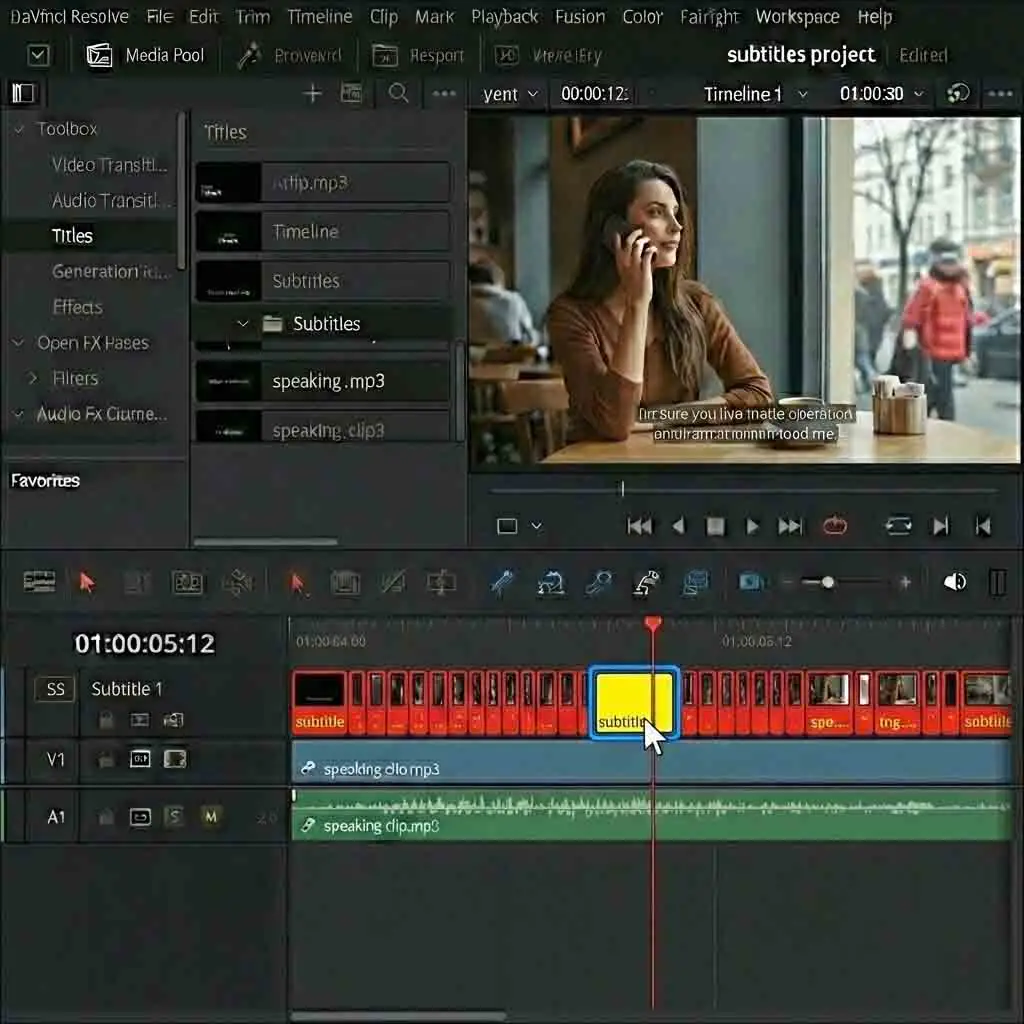
With the clip selected, open the Inspector again. This time, switch to the "Caption" tab. Here, you can edit the text content. You can also fine-tune the in-and-out timecodes for that one subtitle.
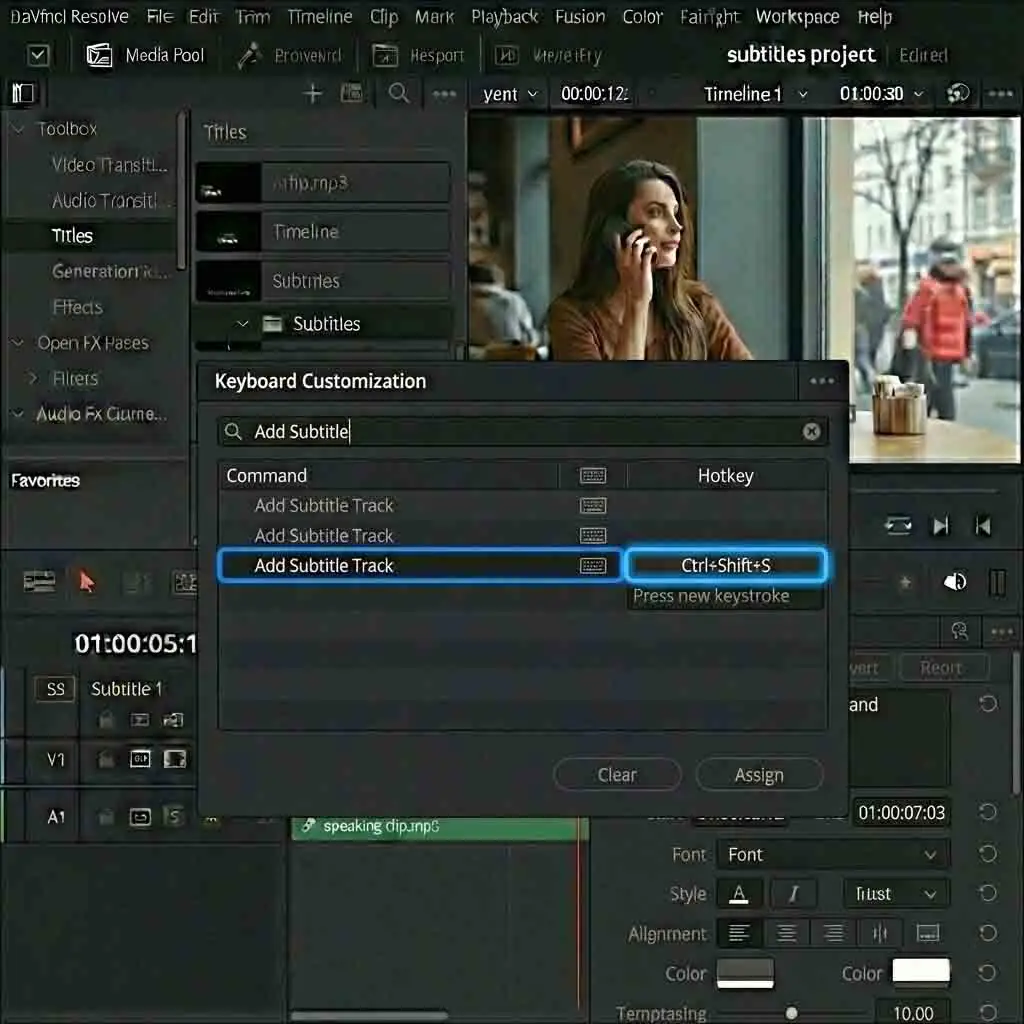
Consider setting custom shortcuts to boost your speed. Press Ctrl + Alt + K to open the Keyboard Customization window. This window lets you change the keys that trigger specific actions in DaVinci Resolve. Find commands like "Add Subtitle" and assign a personal hotkey—a chosen keyboard combination. This makes manual adjustments to your davinci resolve subtitles even faster. And if you ever need to share your work, davinci resolve export subtitles options are easy to find.
Perfection always requires adjustment, and threads focused on AI timing issues share solutions for when automatically generated davinci resolve subtitles drift, helping editors keep every caption perfectly aligned with the spoken audio on the timeline. (Why are Davinci AI subtitles so bad with timing)
4.Perfecting the Final Step: Two Choices for davinci resolve export subtitles
You have finished creating and editing your subtitles. Now it is time for the final step: exporting. The correct way to export your davinci resolve subtitles depends on your goals. It also depends on your publishing platform. This is a strategic choice, not just a technical one.
Different export methods impact the viewer's experience. DaVinci Resolve provides two clear paths for handling davinci resolve subtitles. We will break down both methods. This ensures your work looks perfect. Here are your options for davinci resolve export subtitles.
4.1. Option One: Burn into Video (Embedded Subtitles)
The first method is to "burn" your davinci resolve subtitles into the video frame. The subtitles become a permanent part of the video image. Viewers cannot turn them off or remove them.
This approach is best for short-form content like Instagram Reels or TikTok. Videos often autoplay on mute on these platforms. Burned-in davinci resolve subtitles grab attention immediately. This is also the right choice for total control over the final look. It ensures every viewer sees the exact same style.
The process is very straightforward. Go to the "Deliver" page and scroll down to "Render Settings". Find the "Subtitle Settings" panel on the left. Check "Export Subtitle" here. Then, choose "Burn into video" in the format options below. Once set, your exported video file will contain visible davinci resolve subtitles. They are permanent. This process is as simple as the add subtitles in davinci method you learned earlier.
4.2. Option Two: Export as a Separate File (.srt)
The second method is often recommended. You export your davinci resolve subtitles as a separate .srt file. This file is independent of your video. You can link it when you upload to a platform.
This method is the gold standard for platforms like YouTube, Vimeo, and Bilibili. It gives viewers a choice. They can turn captions on or off. They can even switch languages. Furthermore, search engines can read the text in an SRT file. This is excellent for video SEO. It helps more people discover your davinci resolve subtitles content.
The setup is also in the "Subtitle Settings" on the "Deliver" page. Choose "As a separate file" in the format options this time. In the dropdown below, make sure you select SRT. This is the universal davinci resolve subtitles format.
DaVinci Resolve will create a separate .srt file when you render. It uses the same name and folder as your video. This file uses the track you perfected after the davinci resolve srt import. This ensures consistency.
| Step | Action | Result |
|---|---|---|
| 1 | Import SRT to Media Pool | Subtitle file is ready for use in project assets. |
| 2 | Add Subtitle Track | Creates dedicated space on timeline for davinci resolve subtitles. |
| 3 | Place & Sync | Drag SRT to track; subtitles automatically align with timecodes. |
| 4 | Export | Choose "Burn into video" or "Separate file (.srt)" in Deliver settings. |
5.Upgrading Your Efficiency: Discover This AI Tool for Bulk Subtitle Processing
5.1. The Next Challenge: Multilingual Projects
Master the subtitle workflow for a single video first. Then, a new challenge emerges: managing multilingual projects. Generating and translating SRT files repeatedly wastes time. It creates a massive time sink. This is where you need a powerful tool like Ai subtitle translator.
5.2. Introducing the Solution: Ai subtitle translator
Ai subtitle translator is a professional tool. It is built around batch capabilities and extensive language support. It frees you from tedious tasks. You can focus on the content of your davinci resolve subtitles.
Imagine uploading all your SRT files at once. The tool handles the translation and formatting tasks. You do not need to process each file by hand. This boosts efficiency compared to single-file tools like subtitle edit whisper.
5.3. Core Advantages and Your Free Trial
The core advantages of this subrip software are clear. First, it supports accurate translation between over 100 languages. This ensures your davinci resolve subtitles reach a global audience. Second, it offers one-click batch processing. This feature saves up to 90% of the time spent on multilingual projects.
It is currently available for a free trial. You should experience it firsthand if your workflow involves multilingual content. See how Ai subtitle translator simplifies translation work. It becomes as simple as achieving automatic subtitles davinci resolve free.
This tool provides online subtitle translation services and supports formats such as SRT, VTT, and ASS, allowing you to upload your files and instantly generate multilingual captions optimized for workflows involving davinci resolve subtitles and global video localization. (professional online subtitle translator for fast, accurate multilingual files)
6.Conclusion and Call to Action
Forget the pain of typing subtitles line-by-line in DaVinci Resolve. The secret to handling davinci resolve subtitles lies in the standard workflow. Simply generate SRT externally and import quickly.
This technique is not a minor improvement. It is a revolutionary workflow. It will save you at least one hour on every project. You now have the knowledge to make your davinci resolve subtitles tasks easy.
Do not just read about it. Take action now. Download Subtitle Edit and apply this method to your next project. Experience the efficiency of this three-minute workflow. See how simple working with davinci resolve subtitles can be.
Did this tutorial provide real value to you? Please share it with your friends. Help those
Reference
How to Add Subtitles in DaVinci Resolve – Simon Sayssimonsaysai
How to automatically add subtitles in DaVinci Resolve – HHU Blogblogs.phil.hhu